
Light trail photography is the epitome of blending technical precision with artistic expression. This unique style of photography captures the dynamic motion of light sources over an extended period, transforming otherwise ordinary urban, railway, or motorway scenes into stunning visual spectacles. Whether you’re an amateur exploring new techniques or a seasoned professional seeking inspiration, the world of light trails offers limitless creative potential.
Using a mix of technical know-how and artistry, let’s break down how to perfect your light trail photography skills. We’ll also reference some captivating examples (the attached images) to provide added insight.
Understanding Light Trail Photography
Light trails are essentially captured using long exposure photography. When your camera’s shutter remains open for an extended period, it records the movement of bright objects like car headlights, train lights, or even fireworks, resulting in streaks or trails of light. These trails symbolize motion and energy, providing a striking contrast to the stillness of the surroundings.
Imagine rushing cars creating a stream of red and white trails along a motorway, or a high-speed train rendering colorful streaks against a stationary train platform. These images reflect the essence of light trail photography, capturing time as an artistically extended moment.
Spotlight on the Featured Photos
The magic of light trail photography comes to life in the featured images. Each photo tells a unique story of motion and energy, demonstrating how proper technique and creativity can transform everyday scenes into extraordinary visuals. Here’s a closer look at the examples used in the blog:
Motorway Light Trails
These images showcase the dynamic nature of light trails along busy motorways. Captured during twilight or nighttime, the long-exposure technique emphasizes red and white trails from vehicle taillights and headlights, weaving through the lanes and converging into the distance.
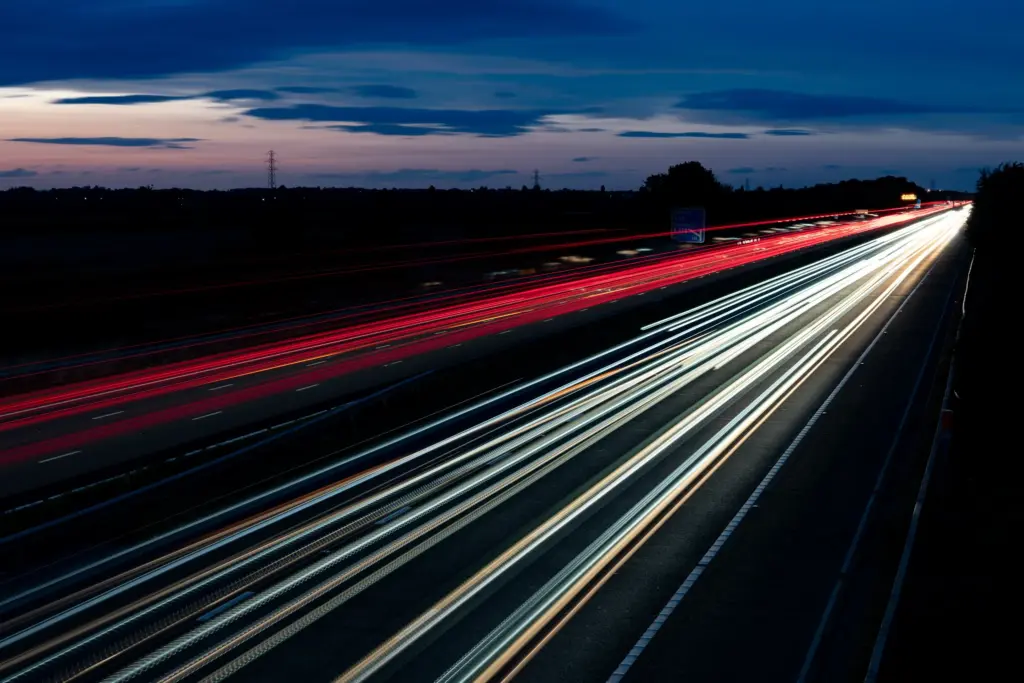
This image highlights a vibrant motorway scene with light trails leading toward a partially visible road sign, adding an urban storytelling element. The twilight sky provides a serene contrast to the bustling energy of the road below.
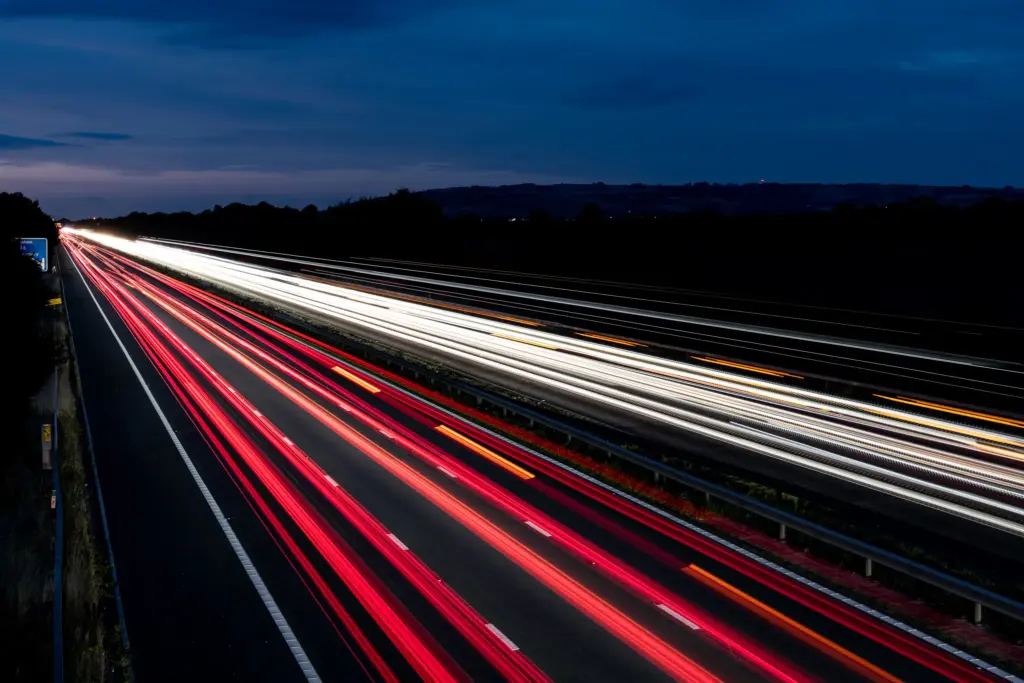
Captured at night, this scene immerses you deep into the glow of light trails. The sharp contrast between the dark landscape and vibrant streams of red and yellow creates an electrifying visual impact.
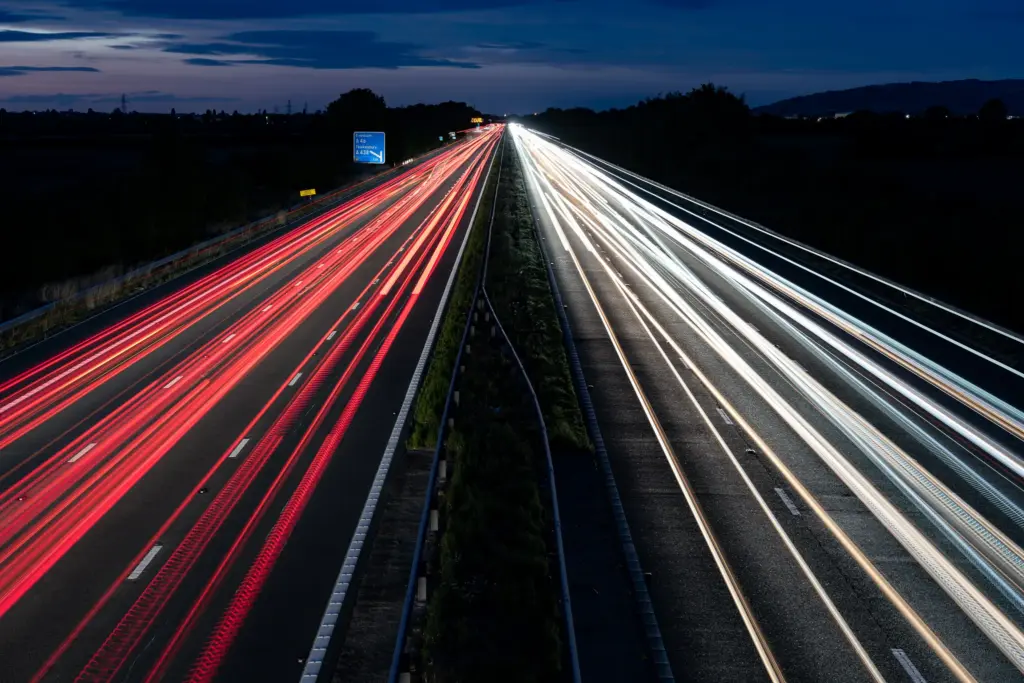
This photograph incorporates not only beautiful motorway trails but also clear signage, helping viewers picture themselves within the setting. The composition balances movement with structured elements like road dividers and signs, painting a perfect harmony of chaos and order.
Train Station and Motion Blur
The railway examples explore a different kind of motion, focusing on high-speed trains captured with light trails. These scenes explore how the rush of modern transportation blends with structured environments.
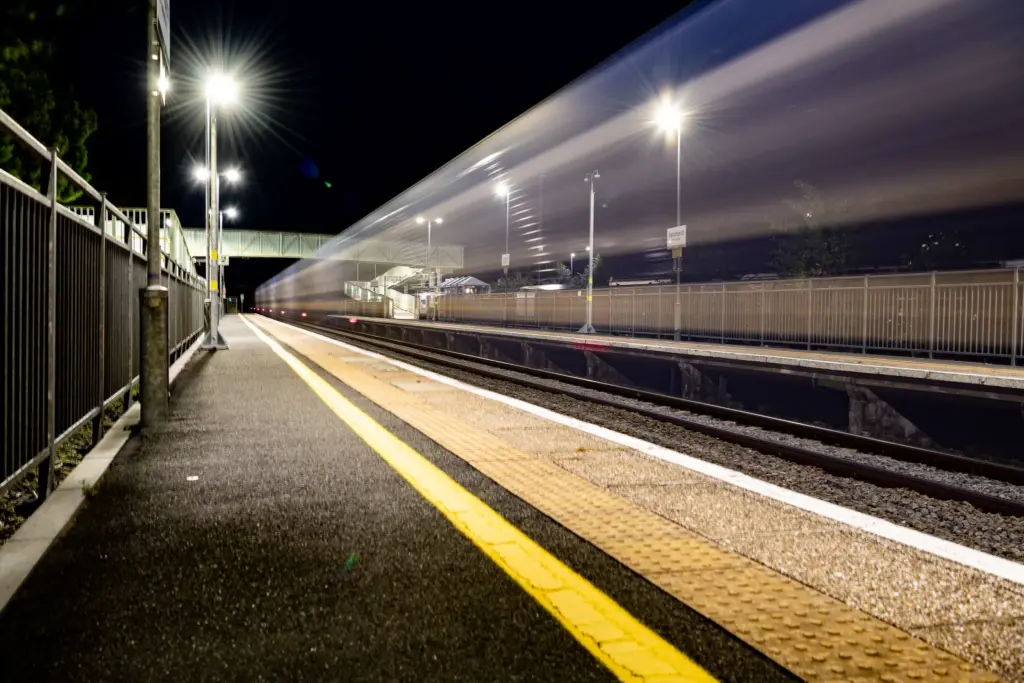
A sleek train streaks through the nighttime platform, leaving behind bright blurs of light against a backdrop of tactile paving and overhead streetlights. The wet surface reflects the trails, doubling the drama of this moment. Meanwhile, the illuminated station remains sharp, contrasting the blur of the moving train.
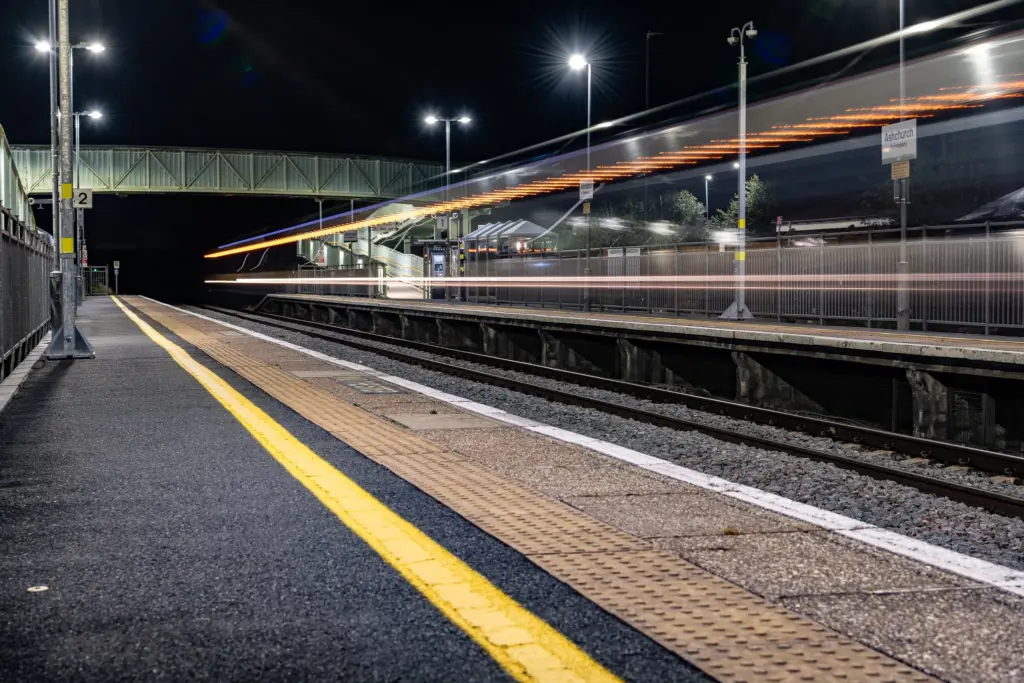
The Ashchurch for Tewkesbury station becomes a stage for a fascinating mix of stillness and speed. Orange and white streaks dominate the right side of the frame, beautifully juxtaposed against the static platforms, fences, and signage. This image demonstrates how careful angling can capture the coexistence of motion and ambience.
Each of these photographs not only illustrates the brilliance of light trail photography but also highlights techniques like thoughtful composition, balanced exposure, and creative use of surroundings to tell a visually captivating story. They’re a testament to the intricate dance between technical skill and artistic vision.
Essential Equipment for Light Trails
Creating exceptional light trails starts with having the right tools. Here’s a list of key equipment:
- Camera
A DSLR or mirrorless camera with manual settings is ideal. You’ll need the flexibility to manually adjust shutter speed, aperture, and ISO. Entry-level cameras can handle light trails just as effectively as advanced ones when used skillfully. - Lens
Wide-angle lenses are preferred for capturing expansive views, such as motorways. For railway platforms, a midrange zoom lens helps create tighter compositions. - Tripod
Stability is non-negotiable in long-exposure photography. Even the steadiest hand cannot hold a camera perfectly still for several seconds (or longer). A sturdy tripod ensures sharp results. - Remote Shutter Release
A remote trigger or your camera’s built-in timer helps avoid vibrations caused by physically pressing the shutter button. - Neutral Density (ND) Filter
If shooting during daylight or in brightly lit environments, an ND filter reduces the light entering the lens, allowing you to extend the exposure time.
Camera Settings for Light Trails
To successfully capture light trails, fine-tuning your camera settings is crucial. Below are general guidelines:
- Shutter Speed
A slower shutter speed (typically between 10 to 30 seconds) is vital to capture the motion of lights. For longer trails, increase the exposure duration, especially when working with intricate scenes like the multi-lane motorways. - Aperture
Use a small aperture (f/8 to f/16) to maintain sharpness across the frame while controlling the amount of light entering the lens. - ISO
Always aim for the lowest possible ISO (e.g., ISO 100) to minimize noise, especially in nighttime shots. - Focus
Switch to manual focus and lock onto a specific point in the scene. For example, if you’re balancing both the train platform and light trails, pre-focus on the edge of the platform or midway into the tracks. - White Balance
Experiment with your white balance settings to add mood. Auto white balance works well, but adjusting to a cooler tone can enhance the drama in night scenes.
Composing Light Trail Shots
Composition transforms a technically correct photo into an aesthetically stunning one. Consider these tips:
- Lead the Viewer’s Eye
Light trails naturally guide the viewer’s eye thanks to their linear motion. Use this trait strategically, like the converging trails in the motorway shot, which lead toward the horizon. - Frame with Surroundings
Including environment features like road signs or train station elements adds context and depth to your photographs. This highlights the relationship between moving and static elements. - Play with Perspective
Experiment with shooting angles. Capture trails head-on for a direct flow toward the viewer, or from above for a bird’s-eye perspective of interwoven roads or railways.
Post-Processing Tips
Editing can elevate an already great light trail photograph. Use post-processing software like Adobe Lightroom or Photoshop to fine-tune your results. Key adjustments include:
- Enhance Contrast
Increase contrast to deepen the black tones of the night and make the light trails pop. - Adjust Highlights and Shadows
Highlight control brings out the brilliance of light trails, while shadow adjustments retain detail in less illuminated areas, evident in the station architecture. - Color Grading
Apply subtle color grading to enhance the mood. Adjust the saturation of reds, blues, or yellows for greater visual impact, as demonstrated in the vibrant warmth of the station shots. - Crop and Straighten
Ensure the horizon or base aligns properly. A crooked edge can be distracting in otherwise symmetrical shots like motorways.
Creative Possibilities
Once you’ve mastered the basics, the possibilities for creative exploration are endless. Try combining light trails with architectural landmarks or reflections on wet surfaces, as subtly evident in the railway shots. Even experimenting with different times of day and weather conditions (e.g., twilight vs. full darkness) alters the narrative of your imagery.
Get Started Today
Light trail photography is more than just a technical challenge; it’s an opportunity to craft vivid stories of movement, energy, and time. Drawing inspiration from bustling roads or high-speed railways, like the ones captured in our example images, you can create visually compelling works that are both technically precise and artistically expressive.
Now it’s your turn. Grab your camera, scout out a location, and experiment. With practice, you’ll discover that the light trails you capture aren’t just photographs—they’re dynamic poems written in light.